Set Up WhatsApp Business on Everest TMS
WhatsApp notifications allow your customers and delivery drivers to receive real-time updates on the status of their missions directly in WhatsApp. This detailed guide walks you through the complete configuration of this feature on Everest TMS, from creating the WhatsApp Business account to sending your first notification.
Table of Contents
- Prerequisites
- Step 1: Create a Meta Business Manager account
- Step 2: Create a Meta application
- Step 3: Configure WhatsApp Business API
- Step 4: Business account verification
- Step 5: Retrieve API credentials
- Step 6: Create WhatsApp templates
- Step 7: Configure notifications in Everest TMS
- Pricing
- Best practices
Prerequisites
Before you begin, make sure you have:
- An active Everest TMS account (all Everest customers have access to this feature)
- A dedicated phone number not used on WhatsApp Messenger or WhatsApp Business App
- Business documents for verification (SIRET, KBIS, proof of address)
- A payment card to configure WhatsApp message payments
- A professional website in your company’s name
⚠️ Important: The phone number you associate with the WhatsApp Business API can no longer be used on the standard WhatsApp application. It is recommended to use a new number dedicated exclusively to this API.
Step 1: Create a Meta Business Manager account
Meta Business Manager is the central platform for managing all your Meta business assets, including WhatsApp Business.
1.1 Account creation
- Go to business.facebook.com
- Click on “Create an account”
- Fill in your business information:
- Company name
- Your name
- Professional email address
- Click “Next” and follow the setup steps
1.2 Initial configuration
Once the account is created:
- Add your business information (address, website, phone number)
- Configure two-factor authentication (2FA) to secure your account
- Add team members if necessary with appropriate roles
📚 Meta Documentation: Consult the official Meta Business Manager guide for more details.
Step 2: Create a Meta application
To use the WhatsApp Business API, you must create an application in the Meta developer portal.
2.1 Access the developer portal
- Go to developers.facebook.com
- Log in with your Facebook account associated with Business Manager
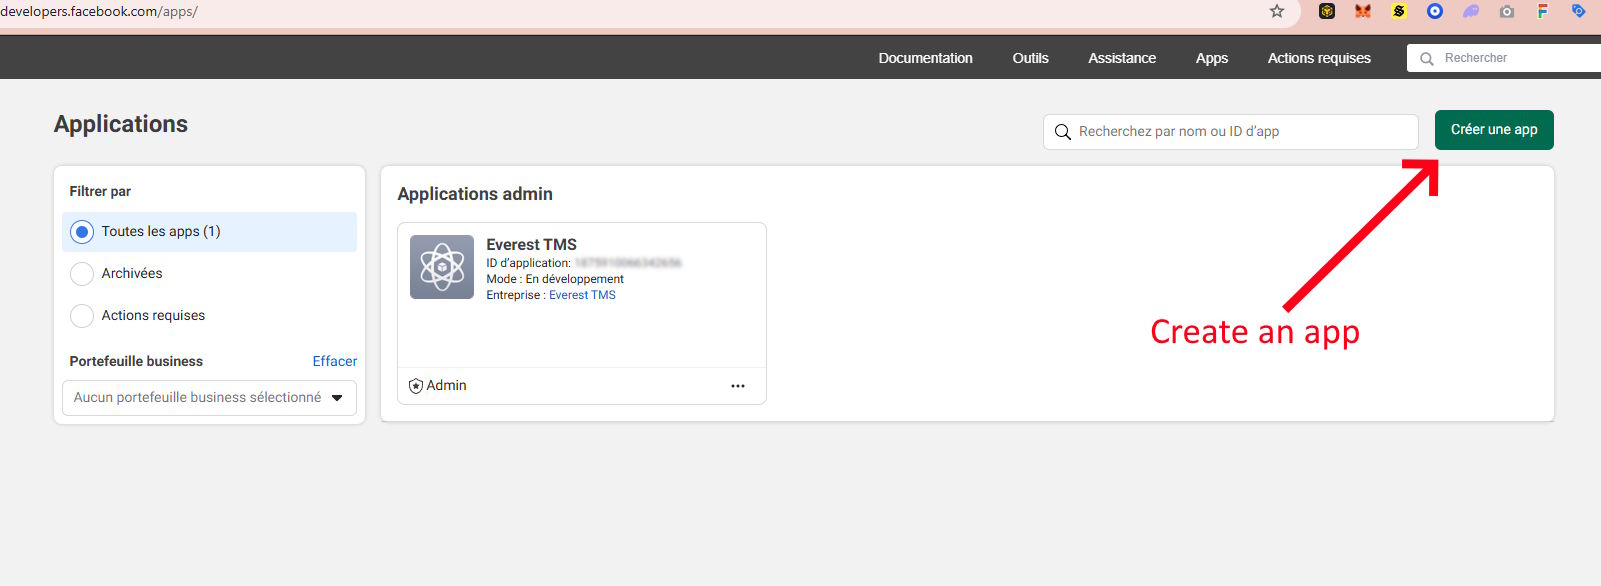
- Click on “My Apps” then “Create App”
2.2 Application configuration
- Select the application type:
- Under “Use cases”, select “Other”
- Under “Type”, select “Business”
- Fill in the requested information:
- App name: For example “Everest TMS Notifications”
- Contact email: Your professional email address
- Business Manager account: Select the account created in step 1
- Complete the CAPTCHA and click “Create App”
💡 Note: Do not include Meta brands like “WhatsApp” in your application name.
2.3 Configure application information
In your application dashboard:
- Go to “Settings” > “Basic Settings”
- Fill in:
- Privacy policy URL (required)
- Terms of service URL
- Application category
- Application icon (optional)
- Save changes
Step 3: Configure WhatsApp Business API
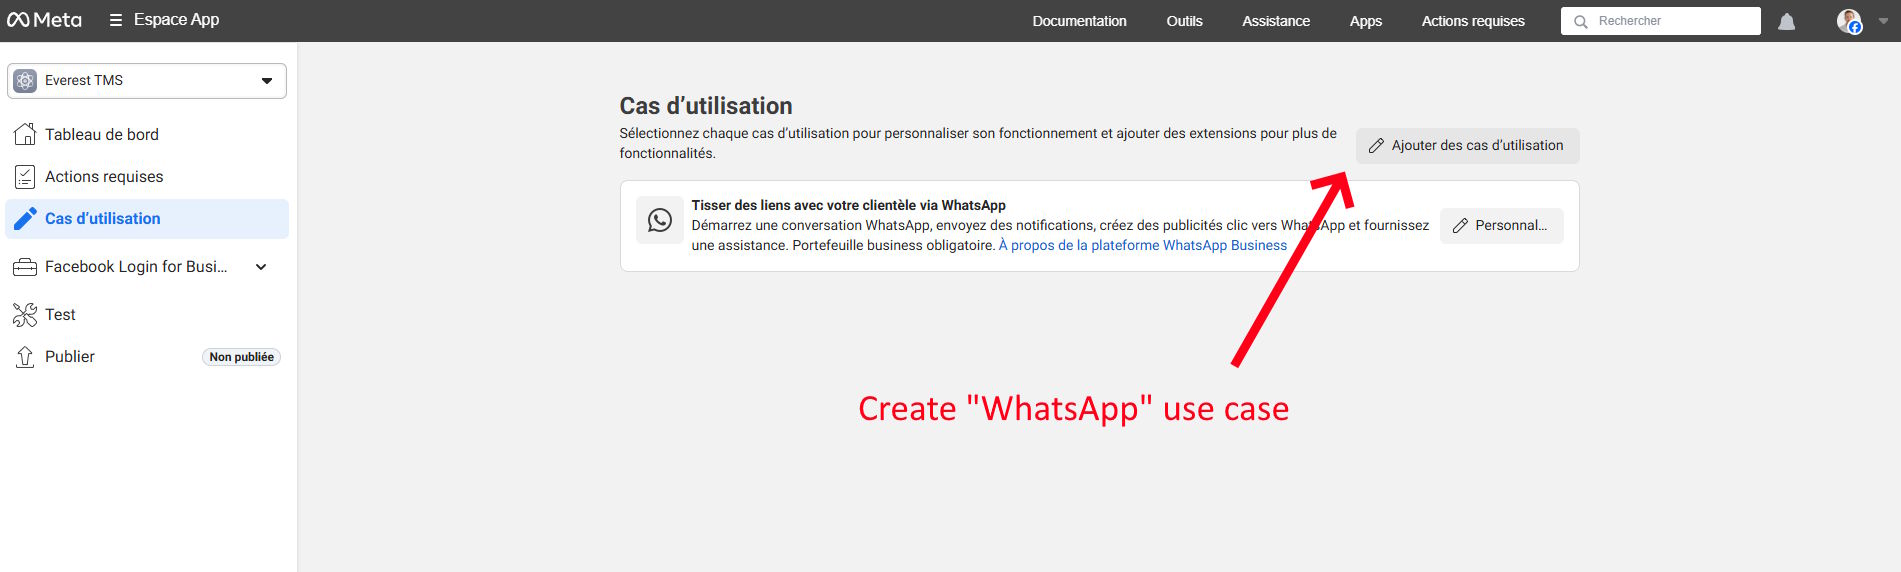
3.1 Add the WhatsApp product
- In your application dashboard, click on “Add Product”
- Search for “WhatsApp” in the list of available products
- Click “Set up” next to WhatsApp
3.2 Create a WhatsApp Business account
If you don’t have a WhatsApp Business account yet:
- Select “Create a WhatsApp Business account”
- Enter your business display name (visible to your customers)
- Choose your timezone
- Select your business category
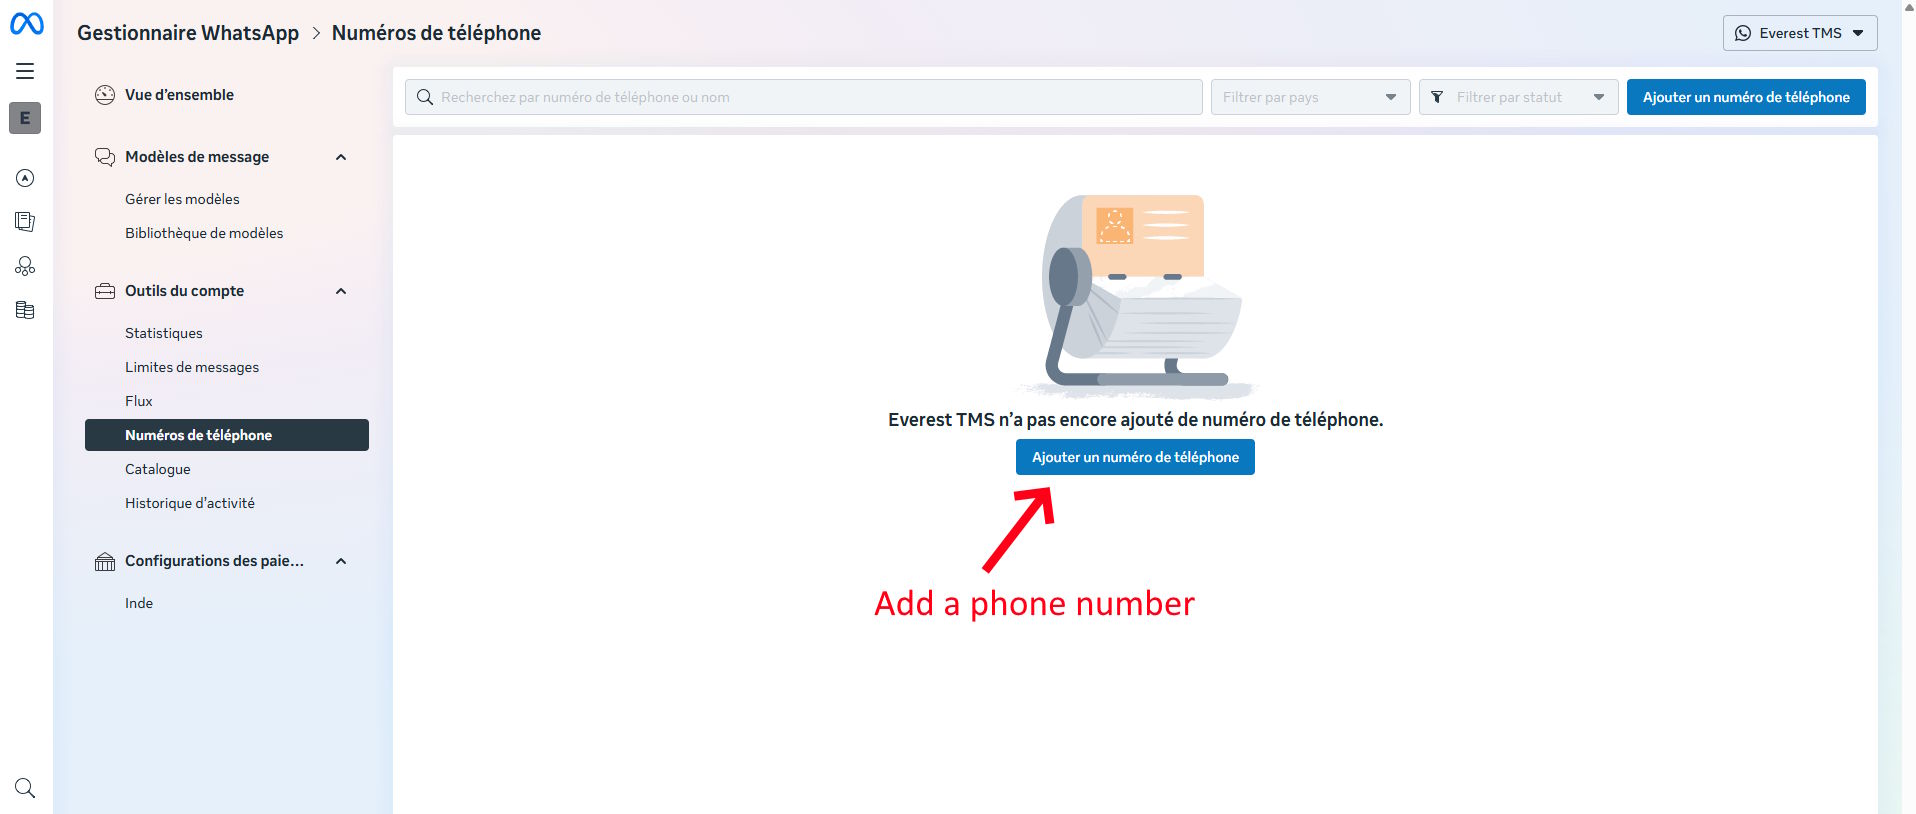
3.3 Add a phone number
- In the “Phone Numbers” section, click “Add Phone Number”
- Enter your phone number with country code (e.g.: +33 for France)
- Choose the verification method: SMS or Voice call
- Enter the 6-digit verification code received
- The number is now associated with your WhatsApp Business account
⚠️ Reminder: This number must not already be used on WhatsApp Messenger or the WhatsApp Business app. Once associated with the API, it can no longer be used on these applications.
3.4 Configure payment method
Before you can send messages, you must link a payment method to your WhatsApp Business account.
- In Meta Business Manager, go to “Payment Settings”
- Click “Add Payment Method”
- Enter your credit card information
- Set a spending limit if desired
- Validate the configuration
💳 Important: Without a configured payment method, you will not be able to send messages in production, even if your templates are approved.
Step 4: Business account verification
Verifying your business is essential to:
- Unlock message sending limits (beyond 1,000 conversations per day)
- Obtain official certification (blue badge)
- Improve your customers’ trust
- Access advanced features
4.1 Start the verification
- In Meta Business Manager, go to “Business Settings”
- Click on “Security” > “Business Verification”
- Click “Start Verification”
4.2 Required documents
Prepare the following documents (depending on your country):
- Kbis extract or official registration document
- Recent utility bill in the company’s name
- Tax return for the business
- Company bylaws
- ID document of the legal representative
4.3 Submit documents
- Upload the requested documents (accepted formats: PDF, JPG, PNG)
- Verify that the information exactly matches your company name
- Submit the verification request
4.4 Processing time
- Average time: 1 to 2 weeks
- Meta may request additional documents during the process
- You will receive an email notification once verification is complete
💡 Tip: Start the verification process as soon as possible, even if you’re not ready to send messages yet. This will save you time later.
Step 5: Retrieve API credentials
To configure Everest TMS, you will need three credentials: the Phone Number ID, the WABA ID (WhatsApp Business Account ID), and the Access Token.
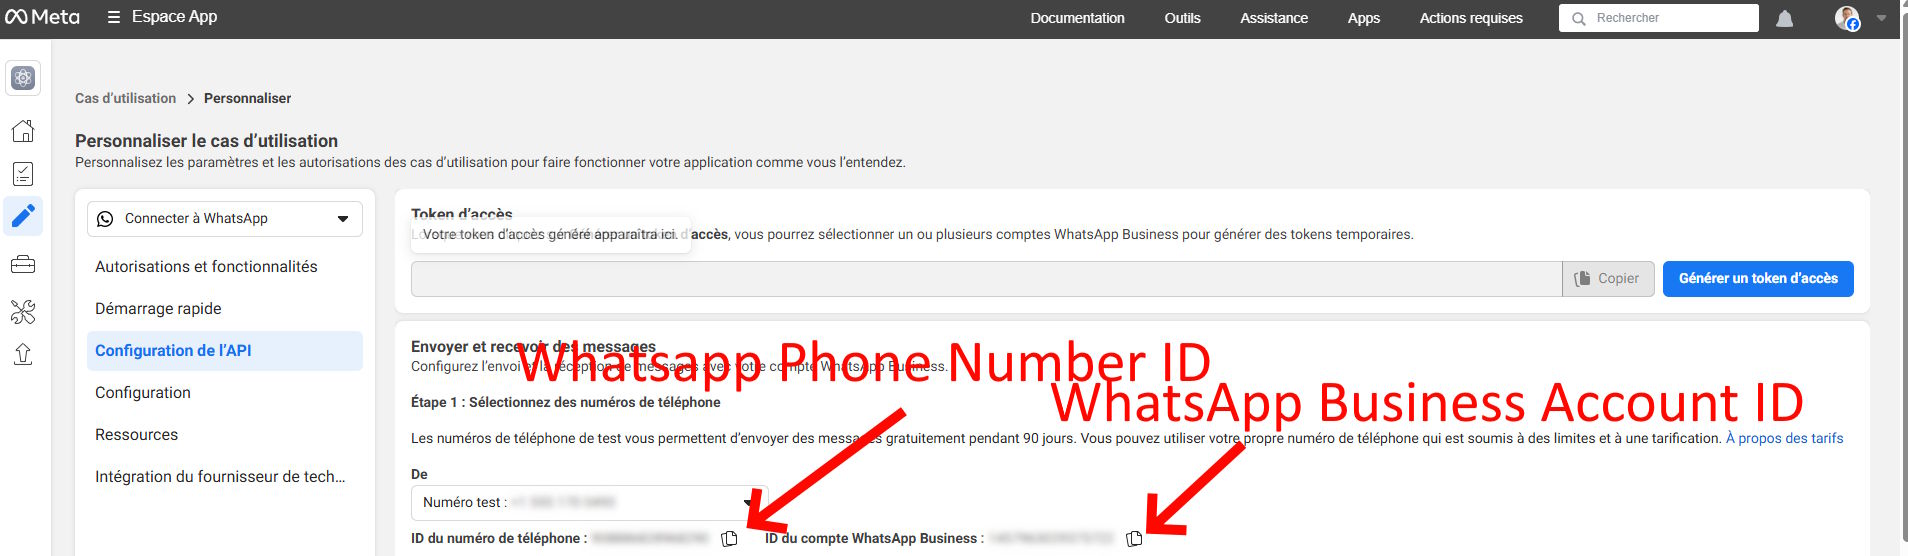
5.1 Retrieve the Phone Number ID
- In your Meta application, go to “WhatsApp” > “API Setup” (or “Quickstart”)
- In “Step 1: Select phone number”, you will see the list of your numbers
- The Phone Number ID is displayed under each number (format:
1234567891234567) - Note this identifier, you will need it for Everest
5.2 Retrieve the WABA ID
Method 1 – Via Meta Business Manager:
- Go to business.facebook.com
- Click on “Business Settings”
- In the left menu, select “Accounts” > “WhatsApp Business Accounts”
- Click on your WhatsApp account
- The WABA ID is displayed in the side panel (format:
1234567891234567)
Method 2 – Via the developer portal:
- In your Meta application, go to “WhatsApp” > “API Setup”
- The WABA ID (WhatsApp Business Account ID) is displayed in “Step 1” next to your phone number
5.3 Generate a permanent access token
The access token is used to authenticate API requests from Everest to WhatsApp.
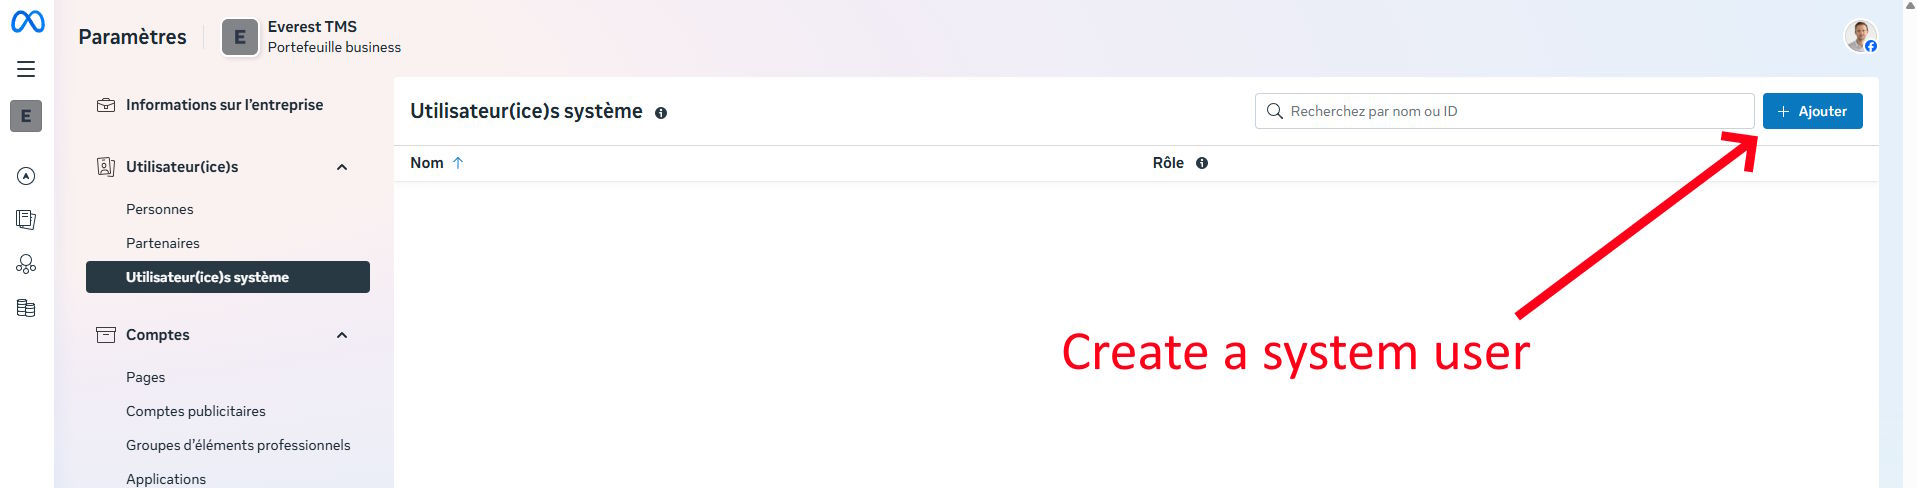
5.3.1 Create a system user
- In Meta Business Manager, go to “Business Settings”
- Click on “Users” > “System Users”
- Click “Add” to create a new system user
- Give it a name (e.g.: “Everest TMS API”)
- Select the “Administrator” role
- Click “Create System User”
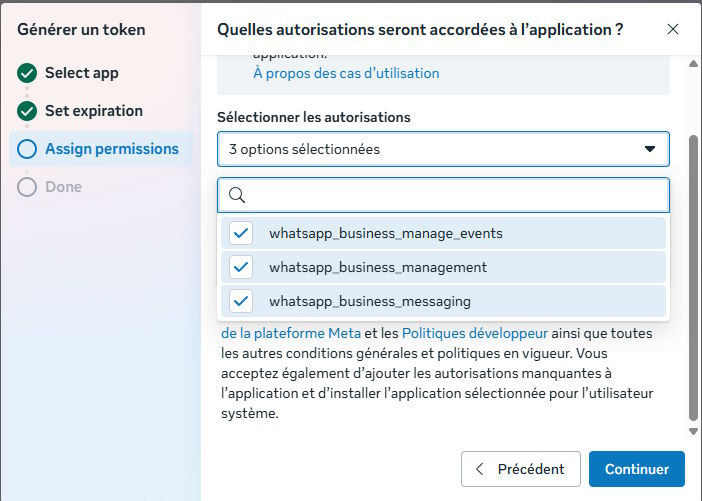
5.3.2 Assign permissions
- Click on the system user you just created
- Click “Add Assets”
- Select:
- Apps: Your Meta application
- WhatsApp Business Accounts: Your WABA account
- Set the token duration: “Never expire” (recommended for production use)
- Assign the following permissions:
whatsapp_business_management(Management)whatsapp_business_messaging(Messaging)
- Click “Save Changes”
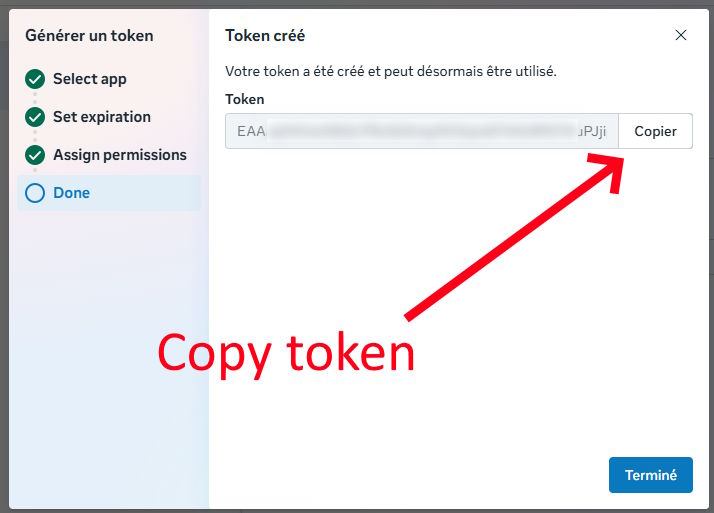
5.3.3 Generate the token
- Copy the token immediately and keep it safe (you won’t be able to see it again)
🔒 Security: The access token is sensitive. Never share it publicly and store it securely. If you think it has been compromised, generate a new one immediately.
Step 6: Create WhatsApp templates
WhatsApp templates are pre-approved messages that you can send to your customers. All messages initiated by the business (outside of an active conversation within 24 hours) must use a template approved by Meta.
6.1 Understanding template categories
Meta offers several template categories:
- UTILITY: Transactional notifications (order confirmations, delivery updates, reminders)
- AUTHENTICATION: OTP codes and identity verifications
- MARKETING: Promotional and marketing messages (require explicit customer consent)
💡 For delivery notifications in Everest TMS, use the UTILITY category.
6.2 Create a template
- In Meta Business Manager, go to “Account Tools” > “Message Templates”
- Click “Create Template”
6.2.1 Basic information
- Template name: Use a descriptive name in lowercase with underscores (e.g.:
everest_mission_dispatched,new_delivery) - Category: Select UTILITY
- Languages: Choose your customers’ languages (e.g.: French)
6.2.2 Compose the message
Header (optional):
- Type: Text, Image, Video or Document
- For simple text: “New mission!”
Message body: Here is an example template for a new mission notification:
Hello,
Mission {{mission_ref}}, scheduled for {{mission_date}} has been created.
Thank you for your trust,
EVEREST
In this example:
{{mission_ref}}will be replaced by the mission reference (e.g.: “AB1CD2EFG”){{mission_date}}will be replaced by the mission date (e.g.: “15/03/2024 14h30”)
Footer (optional):
- Short text that will appear at the bottom of the message (e.g.: “Everest TMS – Delivery management solution”)
Buttons (optional):
- You can add action buttons such as:
- URL button: “Track mission” →
https://yourdomain.everst.io/follow/{{mission_ref}} - Call button: “Call support”
- Quick reply: “OK”, “Cancel”
- URL button: “Track mission” →
6.2.3 Variables and parameters
Variables in WhatsApp are named: {{mission_ref}}, {{mission_date}} etc. Important rules:
- Maximum 15 variables in the message body
- Maximum 1 variable in the header
- Variables in URL buttons allow you to personalize the link
Example values: When creating the template, Meta will ask for examples for each variable. Here’s what you could enter:
{{mission_ref}}= “AB1CD2EFG”{{mission_date}}= “15/03/2024 14h30”
6.2.4 Submit template for approval
- Verify that your message complies with Meta rules
- Click “Submit”
- The template status changes to “Pending”
- Approval typically takes a few minutes to a few hours
- You will receive an email notification
⚠️ Warning: Templates can be rejected if:
- The content is too promotional for a UTILITY category
- Variable examples are not provided
- The message contains spelling errors
- The format does not comply with Meta guidelines

6.3 Template examples for Everest TMS
Template 1: New mission created
Template name: nouvelle_mission
Category: UTILITY
Language: French
Header: New mission!
Body:
Hello,
Mission {{mission_ref}}, scheduled for {{mission_date}} has been created.
Thank you for your trust,
EVEREST
Examples:
{{mission_ref}} = "AB1CDE2F3"
{{mission_date}} = "15/03/2024"
Template 2: Mission in delivery
Template name: mission_en_cours
Category: UTILITY
Language: French
Body:
Hello,
Your delivery {{mission_ref}} is currently in progress. The driver should arrive around {{mission_date}}.
Track your delivery in real time: {{mission_followlink}}
EVERESTExamples:
{{mission_ref}} = "AB1CDE2F3"
{{mission_date}} = "19/06/2025 14h30"
{{mission_followlink}} = "https://..."
Step 7: Configure notifications in Everest TMS
Now that all elements are in place, let’s configure Everest TMS to send WhatsApp notifications.
7.1 Configure WhatsApp credentials
- Log in to your Everest TMS interface
- Go to
/admin/settings - Select the “Notifications” tab
- In the “WhatsApp Business API Configuration” section, enable notifications:
- Check “Enable WhatsApp notifications”:
Yes
- Check “Enable WhatsApp notifications”:
- Enter the credentials retrieved previously:
- WhatsApp phone number ID :
901234567891234(your Phone Number ID) - WhatsApp Business account ID :
123456789123456(your WABA ID) - WhatsApp access token: Paste the generated permanent access token
- WhatsApp phone number ID :
- Click “Save”
🔐 The token is stored securely and masked after saving.
7.2 Create a WhatsApp notification
7.2.1 Access the notification interface
- In Everest TMS, go to the Notifications section
- Click “Add notification”
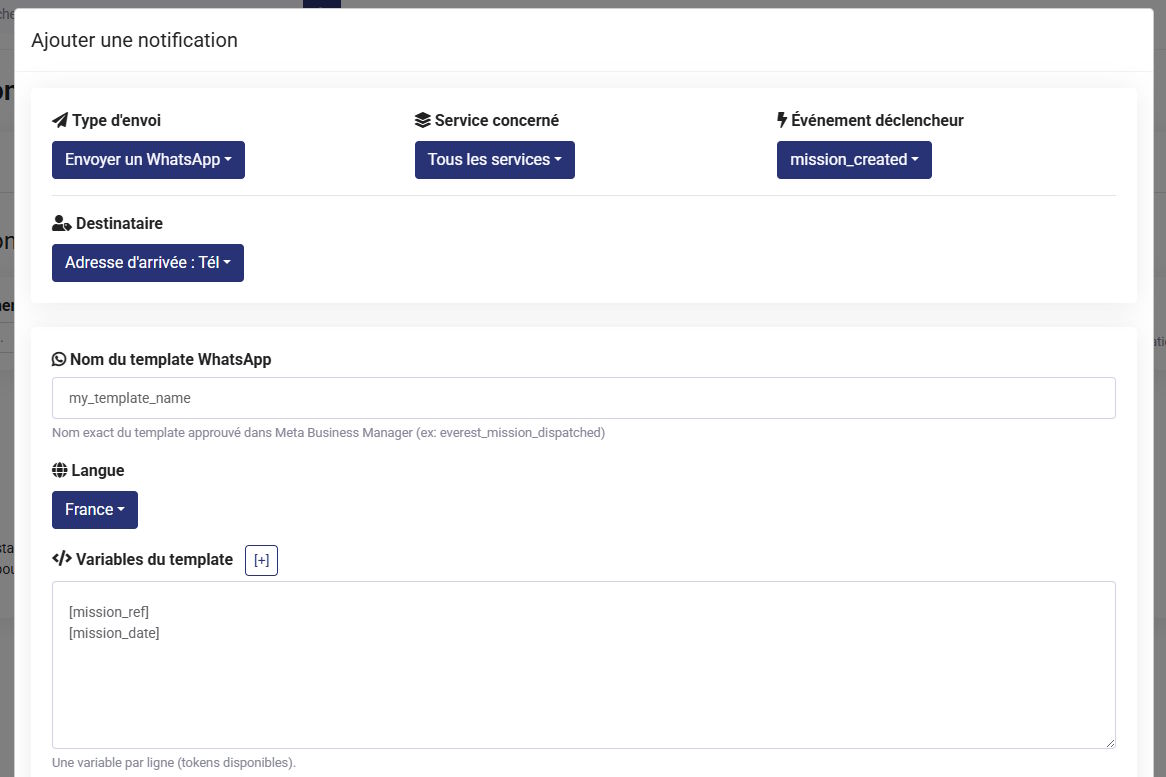
7.2.2 Configure basic parameters
Send type: Select “Send WhatsApp”
Service concerned: Select “All services” to apply to all services, or choose a specific service
Trigger event :
- Select “mission_created” (or another event according to your needs)
- Note: Each notification can only have one trigger. To send notifications at different times, create multiple notifications.
Recipient :
- Select “Dropoff address: Phone” to send to the delivery recipient
- Other available options: client, driver, etc.
7.2.3 Configure WhatsApp template
WhatsApp template name :
- Enter the exact name of your approved template in Meta Business Manager
- Example:
nouvelle_mission,everest_mission_dispatched - ⚠️ The name must match exactly the template created in Meta (respect case and underscores)
Language :
- Select the template language: “England” for English, “France” for French, etc.
- This language must match the one configured in your WhatsApp template
Template variables : C’est ici que vous associez les balises Everest aux variables WhatsApp. Dans WhatsApp, les variables sont nommées {{mission_ref}}, {{mission_date}} etc. Dans Everest, vous devez fournir les valeurs de ces variables en utilisant les balises disponibles. Entrez une variable par ligne dans l’ordre :
[mission_ref]
[mission_date]
Explanation:
- The first line will replace
{{mission_ref}}in your WhatsApp template - The second line will replace
{{mission_date}} - And so on…
7.2.4 Complete example
Let’s imagine your approved WhatsApp template is:
Hello,
Mission {{mission_ref}}, scheduled for {{mission_date}} has been created.
Thank you for your trust,
EVEREST
In Everest TMS, your configuration would be:
- Send type : Send WhatsApp
- Service concerned : All services
- Trigger event : mission_created
- Recipient : Dropoff address : Phone
- WhatsApp template name :
nouvelle_mission - Language : France
- Template variables :
[mission_ref]
[mission_date]
Result: When a new mission is created, the client will receive a WhatsApp message like:
Hello,
Mission ABC1DEF23, scheduled for 15/03/2024 14h30 has been created.
Thank you for your trust,
EVEREST
7.2.5 Validate and save
- Verify that all information is correct
- Click “OK” to save the notification
- The notification is now active!
7.3 Create multiple notifications
You can create as many notifications as needed for different events. For example:
- Notification 1:
mission_created→ Informs the client that a new mission has been created - Notification 2:
mission_finished→ Confirms that the delivery is complete - Notification 3:
mission_failed→ Alert in case of delivery failure
Each notification can use:
- A different WhatsApp template
- Different recipients
- Different variables
Pricing
WhatsApp Business API is a paid service. Meta charges conversations according to type and destination country.
Pricing structure
Conversations are charged per 24-hour conversation initiated by the business. A conversation starts when you send a message and remains open for 24 hours. Conversation types:
- Marketing: Promotional messages
- Utility: Transactional notifications (deliveries, confirmations)
- Authentication: OTP codes and verifications
- Service: Responses to customer messages (free 24h window)
Pricing for France (examples)
Prices vary by country. To view official and updated prices: 👉 WhatsApp Business API Pricing Approximate price examples (for information only, check official prices):
- Utility Conversations: ~€0.0092 per conversation
- Marketing Conversations: ~€0.0154 per conversation
- Authentication Conversations: ~€0.0046 per conversation
💰 Budget tip: If you send 1,000 delivery notifications (Utility) per month in France, this represents approximately €9-10 per month.
Configure payment method
- In Meta Business Manager, go to “Payment Settings”
- Add a credit card or configure automatic debit
- Set a spending limit if needed
- Fees are billed monthly
Sending limits
WhatsApp Business accounts have daily conversation limits:
- Tier 1 (new account): 1,000 unique conversations per day
- Tier 2 (after verification): 10,000 conversations per day
- Tier 3: 100,000 conversations per day
- Tier 4: Unlimited
These limits automatically increase based on:
- The quality of your messages (response rate, blocks)
- The volume of sends
- Your business verification
Best practices
1. Message quality
Meta monitors the quality of your messages through:
- Block rate: If too many customers block you, your rating drops
- Report rate: If your messages are flagged as spam
- Response rate: The more your customers respond, the better your rating
How to maintain good quality:
- Send only useful and relevant messages
- Obtain consent from your customers before contacting them
- Don’t overload your customers with too many notifications
- Personalize your messages with the right variables
2. Consent and opt-in
Before sending WhatsApp messages, ensure your customers have consented to receive notifications:
- Add a checkbox during account creation
- Explicitly mention WhatsApp notifications in your Terms & Conditions
- Allow customers to easily unsubscribe
3. Sending frequency
- Don’t send too many notifications for the same mission
- Limit yourself to key steps: creation, departure, arrival, delivery
- Respect your customers’ time zones
4. Testing before production
Before activating notifications for all your customers:
- Test with your own WhatsApp number
- Verify that variables are correctly replaced
- Ensure the tone and content are appropriate
- Test different scenarios (mission created, cancelled, etc.)
5. Error handling
If a notification fails:
- Verify that the recipient’s phone number is valid
- Ensure the template is approved
- Verify that your API credentials are correct in Everest
- Check the error logs in Everest TMS
6. Monitoring and optimization
- Regularly check the WhatsApp dashboard in Meta Business Manager
- Monitor your quality rating
- Analyze open rates and response rates
- Adjust your templates based on customer feedback
7. GDPR Compliance
Comply with GDPR rules for your European customers:
- Store consents securely
- Allow customers to access their data
- Offer an easy opt-out option
- Do not share customer data with third parties
Common troubleshooting
Template is not approved
Problem: Your template is rejected by Meta. Solutions:
- Verify that the content is not too promotional for a UTILITY category
- Ensure that variable examples are provided
- Correct any spelling or grammar errors
- Review the WhatsApp content guidelines
Messages are not being sent
Problem: Notifications are not being sent from Everest TMS. Solutions:
- Verify that the credentials (Phone Number ID, WABA ID, Token) are correct in
/admin/settings - Ensure the template name matches exactly the one in Meta
- Verify that the template is approved
- Check that you have not exceeded your daily conversation limit
- Verify that the payment method is configured in Meta Business Manager
Variables are not being replaced
Problem: Variables {{mission_ref}}, {{mission_date}} appear as-is in the message. Solutions:
- Verify that you have correctly filled in the Everest tags in “Template variables”
- Ensure the order of tags matches the order of variables in the template
- Check that there are no blank lines or extra spaces
Low quality rating
Problem: Your WhatsApp quality rating is “Red” or “Yellow”. Solutions:
- Reduce sending frequency
- Improve the relevance of your messages
- Remove invalid or inactive numbers from your list
- Only contact customers who have given explicit consent
- Wait a few days before resending bulk messages
Conclusion
You have now successfully configured WhatsApp notifications in Everest TMS! Your customers and drivers will now receive real-time updates directly in their preferred WhatsApp messaging app.
Summary of steps
- ✅ Creating a Meta Business Manager account
- ✅ Creating a Meta application
- ✅ Configuring WhatsApp Business API
- ✅ Verifying the business account
- ✅ Retrieving API credentials
- ✅ Creating approved WhatsApp templates
- ✅ Configuration in Everest TMS
Going further
- Create templates for other events (mission in progress, delivery failure, etc.)
- Customize your messages with more Everest variables
- Integrate action buttons to improve customer experience
- Analyze WhatsApp statistics to optimize your notifications
Need help?
If you encounter difficulties or have questions:
- Check the official WhatsApp Business documentation
- Contact Everest TMS support
- Check the Meta Business Help Center